This post may contain affiliate links. As an Amazon Associate we earn from qualifying purchases.
Can you grow ginger in a pot? Sure you can!
Just fill a pot with soil, stick the ginger root into it, throw a little water at it now and then and you’re good to go, right?
Not quite, although growing ginger root in a pot isn’t all that difficult as long as you pay attention to a few critical factors.
The history of ginger – nah, just kidding!
I can’t stand it when I’m lured to a website by the title of an article or blog post or, worst of all, recipe, and the writer makes me read through 10 lbs. of B.S. before he or she finally fulfills the promise of the title.
Don’t get me wrong, I’m happy to offer all that fluff, but I’ll tell you what: if you really want it, scroll down to the bottom of this post (we even link to some yummy ginger recipes!)
In the meantime, let’s learn how to grow ginger in a pot.
What you’ll need to grow ginger in a pot
- Ginger root (rhizome)
- Sharp, sterilized knife
- Planting pot: At least 16 inches wide and 12 inches deep (10 gallon size), with drainage holes in the bottom
- Potting soil
- Fertilizer

How to prepare the ginger for planting
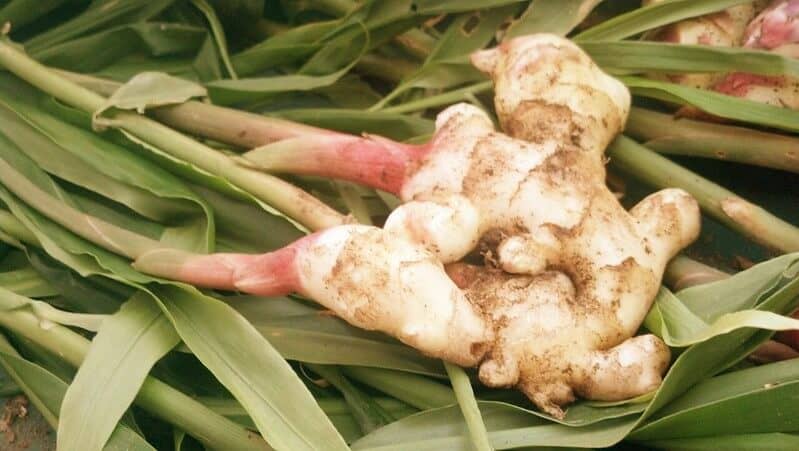
First, let’s call it what it is: you’ll be planting a ginger rhizome, not a “root.” Find out the difference, here.
While many people find success growing ginger from the supermarket, a lot of it is treated with growth retardant. To be on the safe side, soak the grocery store rhizome overnight in a dish of water.
This may not remove the chemical completely, but at least it will give you a fighting chance. If you decide to go the safe route and purchase a rhizome, we found some gorgeous specimens here, at Amazon.com.
Next, buy a quality commercial potting mix. Inexpensive mixes tend to have inadequate amounts of the ingredients necessary to provide the ginger rhizome with both the oxygen and moisture retention it requires.
We highly recommend Espoma Organic Potting Mix. It should be available at larger nurseries You can definitely find it online, here at Amazon.com.
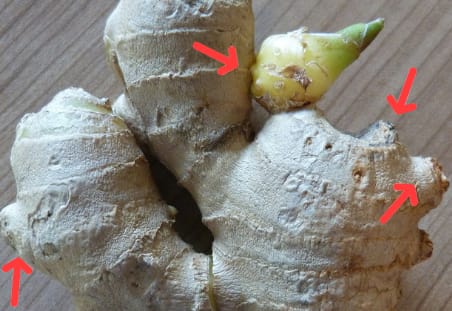
Start the process a day or two before you plan on planting. Use a sharp, sterilized knife to cut the ginger rhizome into 1.5 to 3-inch pieces, each with at least one bud-eye (these are the bumps along the rhizome, as noted in the photo, below.

Set the rhizome pieces (which are now known as “sets”) aside for a day or two to allow the wounds to heal over (just enough so that you aren’t planting it with a gaping, raw wound).
Prepare the planting mix and pot
While you’re waiting for that, get the potting mix ready. Pour it into the pot (we found a good, inexpensive pot here) and saturate it with water. We like to stir it around as we pour water over it to ensure that it’s evenly wet.
Then, set the pot aside to drain. The soil should have the moisture content of a well-wrung sponge when you plant.
- Plant the ginger sets 1 to 2 inches deep, with the bud pointing up and space rhizomes 6 inches apart.
- Place the potted sets in an area that receives filtered sunlight, warmth (temperatures above 60 degrees Fahrenheit) and that isn’t subjected to drafts. Any humidity you can provide will help speed things along.
- Maintain the same soil moisture content as when you planted the sets – don’t overwater the potting mix.

Ginger is notoriously slow to show itself so don’t give up if a month has gone by and nothing is happening.
Post-sprouting care of the ginger in a pot
Once it does, begin a weekly fertilizer schedule. We think the very best is Fish Mix (available at Amazon.com). It is a bit pricey but we’ve found that it increases root mass, which is, after all, what we’re after with ginger, right? Plus, you can use it on other plants as well.
Harvest your ginger when the plant is at least 4-foot in height (unless you’re after baby ginger, then you should brush aside the soil to check the progress of the rhizomes.)
There are several ways to get the ginger out of the soil. Hold the stalk near the soil and lift the entire plant from the soil. Or, brush aside the soil around the shoot you want to harvest and give it a tug to break the rhizome’s connection. Cut the shoots off, wash the ginger and you’re good to go.
By the way, you don’t need to harvest all of it at once. Just take what you need and allow the rest to continue growing.
Stuff you might like to know about ginger
- Scientific name: Zingiber officinale
- Official USDA Hardiness Zones: 8 through 12 (find your growing zone here)
- Is ginger a fruit or vegetable: It is neither. It’s classified as a perennial herb.
- Ginger is considered invasive in some parts of the world. It’s considered a weed in Australia and Puerto Rico and it’s classified as “invasive” in Taiwan.
- Ginger produces compounds known as “gingerols.” Some claim that gingerols reduce inflammation and reduces arthritic pain. Others claim that it boosts the immune system.
- “In Medieval England, the term gingerbread simply meant ‘preserved ginger,’” according to Tory Avi at PBS.org. We didn’t begin referring to the gingerbread dessert we love today until the 15th century.
Ways to cook with ginger
Sheet Pan Garlic Ginger Chicken & Broccoli


