This post may contain affiliate links. As an Amazon Associate we earn from qualifying purchases.
Well, maybe not everywhere, but as a general rule of thumb, fall is among the ideal times for getting out in the garden to propagate roses.
Propagating roses isn’t a quick process. Most of the initial “action” takes place above the soil and you won’t see new growth on the rose cuttings for perhaps months.
Then, it’s a few more months before you can actually plant that rose cutting in the ground. But, hey, winter will keep you occupied and come spring you’ll have a new rose to plant in the garden.
Supplies you’ll need to propagate roses
Gather up all the equipment you’ll need because once you’ve taken the cutting, you’ll need to act quickly so that it doesn’t dry out. Here’s what you’ll need:
- Coco Coir
- Large, watertight container
- Pruning shears
- Small, sharp knife or garden scalpel
- Lysol disinfectant
- Paper towel
- 2 Plastic bags (produce bags from the supermarket are ideal)
- Coarse builder’s sand
- 4-inch planting pot
- Rooting hormone
- Wooden sticks
Coir (pronounced “core”) is typically sold in brick form and will need to be rehydrated and softened before using it in your potting soil. Use a watertight container, large enough to hold the brick and a lot of water.
Coir bricks can hold up to 10 times their weight in water. We buy large bricks so we use a wheel barrow to soften our coir bricks.
Smaller bricks, such as the one we recommend (buy it at Amazon.com), are easier to work with and don’t require the volume of water that the larger bricks do.
Soften these in a drywall bucket (or one of those big buckets you can purchase at Home Depot), a child’s wading pool or even a plastic dish pan. Allow the brick to sit in the water for at least 15 minutes, although it may take longer to rehydrate. Keep pouring water over the brick as it absorbs it.
Check its progress by trying to pull it apart. It should be moist and easily pull free. By the way, don’t toss out the rest of the coir. Allow it to dry and store in a covered container.
While you’re waiting for the coir to rehydrate, sharpen your pruning shears and a small knife (we use a scalpel.)
Soak them in the Lysol (don’t use bleach, it’s corrosive). We use it full-strength but some say you can dilute it with water. Read the label for more.
Let the tools soak for about five minutes and then rinse them under clear water and allow them to air dry.
While they’re drying, fill a planting pot (about 4-inches in diameter is ideal but really, anything with drainage holes will work) with 1 part of coir and 3 parts of sand and wet the mixture until it’s saturated. The potting medium is critical to your success. It must hold moisture, but not too much.
Coir, by the way, is the ideal substitute for peat moss.
Certified arborist, Tom Del Hotal with Fantasia Gardens in Southern California recommends either coarse vermiculite or “A mix of 60% Perlite and 40% finer vermiculite.” Any of the aforementioned mixtures will do great.
Allow the potting mix to drain until it’s moist, not soggy, and then use a pencil or your finger to poke a 3- to 4-inch deep hole in the soil for the cutting.
Now you’re ready to take your rose cutting so grab a moist paper towel, a plastic bag large enough to hold the cutting and your pruners (we like the Felco F-2. Find them at Amazon.com) and head outside to the rose bush. We’re on our way to propagate roses!

Where to cut
Find a stem that has at least two nodes close to the bottom of a stem (nearest the plant). Cut 6 inches off (from the tip, back). 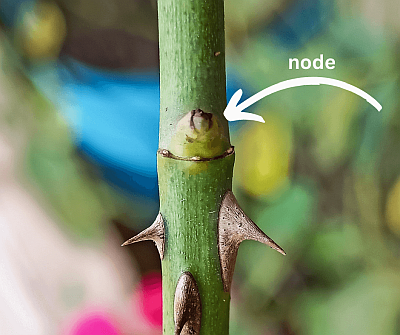
Wrap it in the wet paper towel and seal it in the plastic bag. It’s important that it doesn’t dry out, even briefly.
When you get back to your work bench, remove any leaves, hips and flowers that remain on the cutting.
Use that small knife that you sterilized earlier to cut the planting end of the stem at a 45-degree angle. Use the knife to then lightly scrape away some of the outer surface of the stem, from the lower 1-inch.
Roll the cutting or cuttings back into the damp paper towel, return them to the plastic bag, seal the bag and place it in an area that remains warm. Over the next few weeks, occasionally check the bottom of the cuttings for small roots. This may take some time so be patient.
When you see roots, it’s time to pot up the cuttings. You can either use a small pot or a clear plastic cup or, our preference, a clear plastic, 32-ounce or larger deli container. The latter are deeper than cups and the transparency of the container helps us to see how the rooting is going.
Remove the cuttings from the bag and roll the rooted ends in the rooting hormone powder. Then, stick the rooted end in the prepared planting hole and pack the soil around it so it doesn’t wobble.
We use Hormex rooting powder, which comes in several strengths. We find #3 to be perfect for rose cuttings.
Care of the rose cutting while rooting
Your cutting will need humidity to help it produce roots so if you don’t happen to have a chamber to put it in, you’ll need to rig something up.
Some gardeners use extra long craft sticks (they’re tall so they’ll hold the top of the bag away from the rose cutting). We like these, sold at Amazon.
Stick the sticks (yes, she did say that) into the soil near the edges of the pot, then slip the pot into the plastic bag and seal it. Arrange the plastic so that it’s not touching the rose cutting.
Your cutting requires filtered sunlight so find a spot, either indoors or out, that provides it. Make the spot easily accessible because you’ll need to open the bag every two days or so to allow the air to circulate for about 10 to 15 minutes.
While the bag is open, check the moisture content of the potting mix. It should remain moist but not soggy. When the rose cutting produces foliage, it can come out of the bag permanently.
Care of the rose cutting after rooting
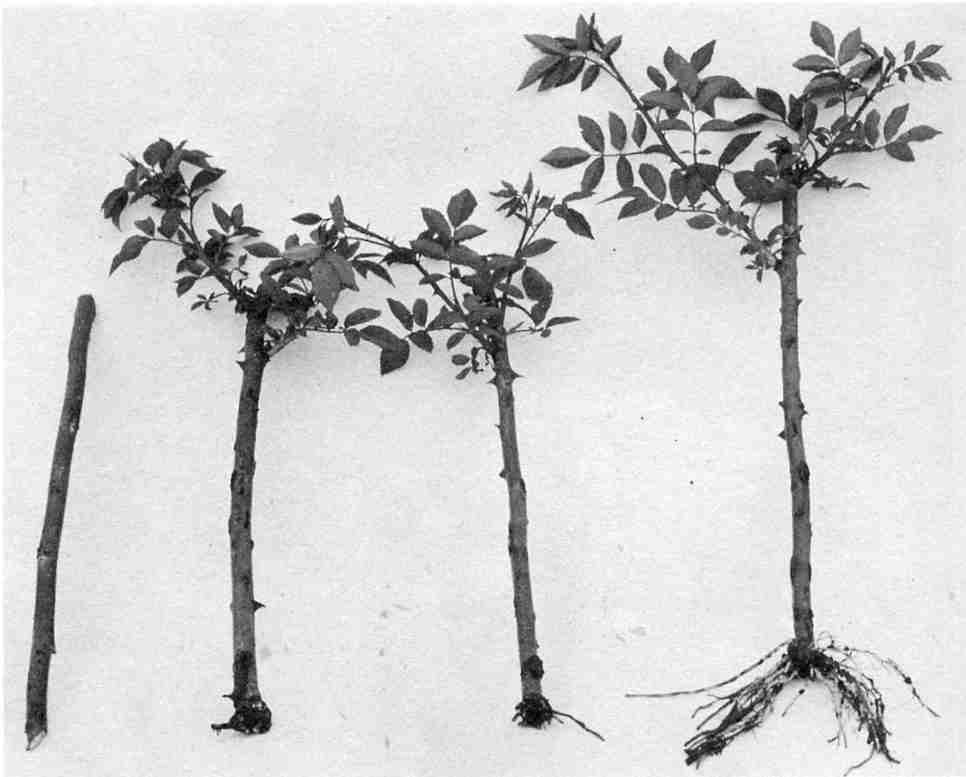
Now, sit back and wait. “An important principle to remember is that roots and leaves have no relationship to
each other,” say the writers at CRFG. “Under identical conditions, some cuttings will grow roots, some will grow leaves, and some will grow both.”
As you can see in the above photo (courtesy of mobot.org) some cuttings will develop a significant amount of foliage before putting out roots. In fact, it may take up to one year for the cutting to have produced enough roots for it to survive in the garden.
When the cutting has filled the cup with roots, it’s time to transfer it into soil. Use a 1-gallon pot and add 60% perlite and 40% potting soil, mixed thoroughly. Moisten the soil mix and plant the cutting(s).
Place the pot outdoors in a shady spot for about three days, then gradually move them into sunnier spots over the course of two weeks. This is known as “hardening off,” and it’s critical to allow the cuttings this time to get acclimated to a new environment.
Keep the soil at the moisture level of a well-wrung sponge. Don’t be tempted to overwater them as they’re still prone to rot. When you see roots at the drainage holes of the pot, up-pot into a 2-gallon pot filled with 60% potting soil and 40% perlite.
Learn more about roses: What is the best way to repot potted roses?