This post may contain affiliate links. As an Amazon Associate we earn from qualifying purchases.
Pity those of us who can’t grow blueberries in our neck of the woods, please! Then, read on to learn how to root blueberry bush cuttings
Tufts University researchers have found that blueberries are higher in antioxidants than any other food. They go on to say that blueberries have pectin that can help lower cholesterol and they are high in vitamin C.
Grow lowbush blueberries in USDA Zones 3 to 6. Half-high blueberry bushes can be grown in zones 3 to 5, and highbush blueberries are hardy in zones 4 to 7. Enter your ZIP code in our zone finder to find your growing zone.
Native to North America, highbush blueberries are easy to grow from cuttings, taken while the plant is dormant. The cutting will root within 8 weeks but the plant won’t yield any berries for at least two years.
What you will need to root blueberry bush cuttings
- 1 gal. planting container
- Coarse sand
- Peat moss
- Pruning shears
- Scalpel or small, sharp knife
- Rooting hormone powder
- Spray bottle filled with water
- Craft sticks, bamboo skewers or small plant stakes
- Plastic bag large enough to hold the planting container or a humidity dome
- Heat mat with a thermostat

Prepare the container for the blueberry bush cuttings
The planting container can be a plastic tub, a rooting tray, an old bucket or planting pot, as long as whatever it is has holes in the bottom for drainage and is tall enough to accommodate the cutting.
Pour the peat moss into the bucket and pour water over it, stirring until it is evenly moist and broken up. The peat moss may be a little dusty when it’s dry, so if you’re sensitive to that sort of stuff, wear a dust mask.
Add an equal amount of coarse sand to the peat moss and, again, pour water and stir until both are combined.
Peat moss is tough to combine so you may have to stir for quite some time to get it moist and mixed with the sand.
When it is, pour it into a gallon planting pot and set it aside to drain. Use your finger or a pencil or something similar to create a planting hole deep enough so that the bottom 2 inches of the cutting will be buried.

Propagating blueberries from softwood cuttings
Softwood cuttings are taken from the current year’s shoots. If you can easily bruise the stem with your fingernail, and the stem snaps if bent, if “there is a gradation in leaf size with the end leaves small and undeveloped, older leaves more or less full-size,” the shoot is softwood, according to Michael A. Dirr and Charles W. Heuser, authors of “The Reference Manual of Woody Plant Propagation: From Seed to Tissue Culture.”
They go on to claim that a cutting rooted in June will be more successful than one rooted in August.
Because these cuttings are still somewhat tender, they will wilt quicker than woodier cuttings, so take wet paper towels or something similar in which to wrap the cuttings until you can stick them.
Cut 4 to 6 inches from a shoot with no flowers. Make the cut just below a node. Remove the tip of the cutting and all but two to three leaves at the top of the cutting, dip the cut end in rooting hormone and stick the cut end into the soil far enough that 1/2 of the cutting is buried.
Place the blueberry bush cutting in an area that receives at least 40% shade and cover it with a dome to maintain humidity. Slightly moist soil and humidity are critical for success.

Rooting blueberry bush cuttings from hardwood
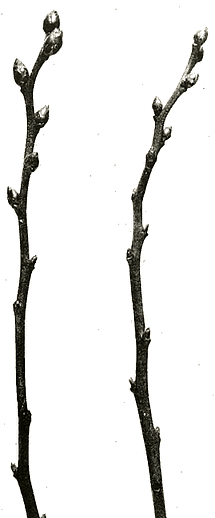
Make sure your pruners are sharp and clean. Find a stem from last year’s growth that is the diameter of a pencil and take a 12- to 36- inch tip cutting. If you want to take more than one cutting, cut them from different branches so that they are all tip cuttings.
Use the scalpel or knife to lightly scrape the bark off the bottom inch of the cutting.
Avoid contaminating the entire jar of hormone powder by pouring out a dime-sized portion into a small dish. If the powder doesn’t stick to the cutting, dip the cutting into water and then dip it into the powder. Make sure at least the bottom 2 inches are covered with the hormone.
Stick the cuttings immediately into the prepared holes in the sand/peat mixture in the pots, 2 inches deep for a 4-inch cutting and 3 inches deep for a 5-inch cutting. Spray the exposed portion of the cuttings with water.
Insert the support sticks into the soil around the edge of the pot. Equally space them so that one is at the top, bottom and either side. The sticks should extend higher than the cutting. Now insert the cutting into the plastic bag. Adjust it so that the plastic is held away from the cutting by the craft sticks and seal the bag.
As an alternative, use a humidity dome, such as these at Bootstrap Farmer or on Amazon. Ensure that the dome you purchase will fit over the size of cutting you usually take. It’s a good investment if you take a lot of cuttings.
Put the heat mat somewhere that gets bright but indirect sun and turn the thermostat to 68 degrees Fahrenheit. Place the bagged cutting on top of it and check to ensure the planting mix remains moist as the cutting takes root. This may take up to two months.
When you see new foliage, open the bag or dome halfway to allow air to circulate.
By the way, all blossoms during the first two years of growth should be removed. Otherwise they will stunt the blueberry plant’s growth.
If you want to root lowbush varieties it’s easy to do by digging up the rhizome, cut into 4-inch sections and root in perlite.
Photo Courtesy: Buyblueberrybushes.com


