This post may contain affiliate links. As an Amazon Associate we earn from qualifying purchases.
Learn about Agapanthus in pots, how to grow agapanthus, how to care for agapanthus, how to divide agapanthus and more.
Agapanthus, also known as lily-of-the Nile, is a summer-flowering plant, native to South Africa. Gardeners love the statement it makes in the landscape, with its long stalk bearing clusters of lavender or white flowers.
They also love its care-free attitude. Aside from a few problems, it’s a plant-it-and-forget-it beauty.
Read on to learn how to care for, propagate and prune the Agapanthus and what to do if something goes wrong.
Caring for Agapanthus
Caring for Agapanthus starts with the soil, right? Agapanthus needs well-draining soil. Too much moisture around the roots almost guarantees rot.
But, there is a fine balance between too much water and not enough. Water when the top few inches of soil is dry, typically once a week is adequate.
The Agapanthus needs at least 6 hours of sunlight per day, except in the desert Southwest and other areas with ultra-hot summers. In that case, provide it a garden spot where it will enjoy light afternoon shade.
You’ll want to fertilize the agapanthus in spring and then again in summer. Ideally, you’ll know exactly which nutrients your soil needs. You can learn this information with a soil testing kit. This allows you to shop smarter for fertilizers.
In a pinch, use a fertilizer with a 1-2-1 ratio (such as 5-10-5 or 15-30-15). Miracle-Gro manufactures an excellent, water-soluble Bloom Booster, available at Amazon. Follow the instructions on the fertilizer label and always apply fertilizer to wet soil.
By the way, the key to what you feed the Agapanthus lies in those first two numbers – low nitrogen and high phosphorus, yet in a balanced formula.

Deadhead the Agapanthus during the growing season. Use pruners (we review them here) or snips to cut the flowering stalk back into the foliage. This keeps the plant from producing seed when it should be producing more flowers.
If winters are harsh in your area, cut the entire plant back to within 6 inches of the soil in autumn. Then, dig up the tuberous root and allow it to dry out completely before planting it in a pot of standard potting soil.
Store it in a dark area where the temperature remains between 35- and 45- degrees Fahrenheit. Bring the potted rhizome out of the storage in early spring.
Gardeners in warmer regions can leave the Agapanthus in its garden spot over the winter. In fact, leave the last flower stalks to help provide nutrients to the plant’s tubers. In spring, remove dead leaves and any flower stalks from the previous season.
How to propagate Agapanthus by seed
Yes, you can grow Agapanthus from seeds, but it’s a slow process. The seeds may not sprout for a month or two. Then, you’ll need to grow them on in a greenhouse or indoors until their third year. And, sadly, you won’t see flowers until its third or fourth year.
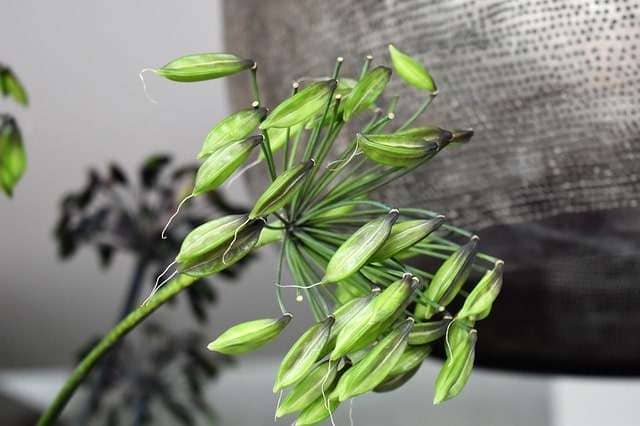
Agapanthus produces seed pods in autumn but wait until they turn papery and almost transparent to remove them from the plant. This typically happens during the latter part of September, but the timing may vary, depending on where you live.
- Use either individual planting pots or a seeding tray, filled with a moist, sterile seed-starting mix (see the Resources section at the end of the article for more information). Sow the seeds on the surface of the soil and cover with a very light layer of vermiculite or sand.
- Place the germination container in an area that doesn’t get direct sun but with an air temperature that remains between 70 and 80 degrees, Fahrenheit. Use a misting bottle to keep the soil moist.
- Wait until the seedlings reach 4 inches in height to transplant them from the flat to individual pots. This may take up to one year after they germinate. See, we told you it’s a long process!
Divide the potted Agapanthus
While it may take a bit of muscle, when you divide a mature Agapanthus, you’ll be able to enjoy those gorgeous flowers much sooner than waiting for the seedlings to mature.
Agapanthus grows from a tuberous root (a type of bulb). As the plant grows, it produces additional tubers that can be divided from the mother plant to produce new plants.
You’ll need to dig the plant out of the garden or remove it from the pot if it’s a potted plant.
You may even luck out and be able to divide one that you’ve just purchased from the nursery. Let’s start with that or your existing Agapanthus if its growing in a plastic nursery pot.
Wait until late summer, until the plant has stopped flowering, to divide it.
Agapanthus roots are thick and plentiful and most likely, your plant is stuck inside the pot. It cracks us up to watch the YouTube videos of people attempting to get the plant out of the pot. They shake it, they pound it, they even use loppers to cut the pot open.
Try this first: Lay the potted Agapanthus on the ground and push firmly on the sides of the pot. Roll the pot forward and push on the sides again. Keep doing this until you’ve pressed, firmly (you might even try hitting the sides) until you’ve gone completely around the pot.
Then, pound the bottom of it on the ground. What you’re trying to do is get those roots to let go of the pot. This method has always worked for us. You may have to repeat the rolling and VERY FIRM pressing several times, but it’ll work.
Once removed from the pot, cut the bottom of the rootball with a saw or large, sharp knife so that you can reach the soil that is inside those circling roots.
Shake or dig out the soil. This allows the roots to loosen so that you’ll have a better idea of where to make the first cut.
Use a saw (we review them for you here) or a very sharp knife to slice through the rootball in an area that will allow you to have separate plants with roots.
Next, trim the roots shorter if you need to for the divisions to fit into pots.
If you damage the rhizomes as you divide the Agapanthus, either allow the divisions to callus overnight or dust them wounds with a fungicide powder before planting.
Dividing the ground-grown Agapanthus
If the Agapanthus is large, cut the foliage to about 6 inches above the soil. This will make it easier to work with.
Stick a sharp spade into the soil, about 6 inches from the base of the plant. Rock the spade back and forth, pull it out and stick it back into the soil to create a new cut, next to and connecting to the first cut. Do this until you’ve cut all the way around the plant.
Use the spade as a lever and position it so that it goes under the rootball. Pry the Agapanthus out of the soil. Again, depending on how large it is and how long it has been growing, you may need an extra pair of hands to get it out of the soil.
Use a crow bar or long-handled shovel if necessary. And, don’t worry about hurting the plant – it can take a lot of rough handling.
Follow the aforementioned instructions on loosening the roots and removing the soil within the ball.
If you notice damaged or dead roots, use pruners to snip them off (we review pruning shears, here).
Plant the divisions at least one foot apart in a sunny part of the garden and keep them slightly moist until you see new growth.
How to plant Lily of the Nile
Whether you’ll be planting divisions you’ve just created or a brand-new Agapanthus from the nursery, careful soil preparation sets the plant up for success.
- Dig a planting hole that is three times the diameter and the same depth as the nursery pot in which the agapanthus is growing (or the root system if you’re planting a division).
- Remove the plant from the pot, place the roots into the hole and backfill halfway with soil.
- Run water into the hole until it’s full. Allow it to drain, then finish filling the hole with soil. The water helps remove air pockets from the soil and settles the soil around the roots.
- Use your hands to pat the soil around the base of the agapanthus.
- Spread a 3-inch layer of mulch on the soil, 2 inches away from it but completely surrounding the plant.
- Water the Agapanthus until the soil is saturated and keep it moist while the plant becomes established. When you see new growth, allow the top inch of soil to dry before watering again.
Agapanthus problems
Agapanthus is, overall, resistant to most diseases and pests. There are a few things to watch for, however.
Check the Agapanthus frequently for signs of botrytis, a disease caused by a fungus. Symptoms of botrytis are brown spots on unopened flowers and foliage and gray or brown dust-like spores on the leaves.
While it doesn’t always solve the problem, try spraying the buds with a fungicide (the type to use depends on the variety so read the label carefully). Then, spray again when the flower opens.
If this doesn’t work, remove the diseased parts of the Agapanthus and keep an eye on the plant. You may need to destroy the plant if all else fails.
Avoid the disease, especially if you live in a humid climate, by purchasing disease-resistant varieties.
If the tips of the Agapanthus’ leaves are brown and the leaves in the middle of the plant are light green, it may be the victim of another fungus, Macrophoma agapanthii. Treatment involves spraying the plant with a fungicide containing mancozeb (see Resources at the end of this article).
No flowers? Yellow leaf tips? Back off on watering. If that doesn’t help, amend the soil with compost to improve drainage.
Yellow leaves: There are several causes of this. See our article, “4 Causes of Agapanthus Leaves Turning Yellow.”
Snails love Agapanthus. You’ll find them clustered inside the clump and clustered in the shade around it. Picking them off by hand is the easiest way to control them.
Discourage pests in general by keeping the soil around the plant free of debris.
Resources
Miracle Gro Bloom Booster Fertilizer


